Bonus Days: Earn to Redeem!


It's almost time for one of my favorite promotions. 
Bonus Days is back! 
With a few easy steps you can join the savings too!
Mark your calendars for July 3rd-31st.


1. EARN

Shop and earn a $5 USD coupon for every $50 USD you spend between 3–31 July! There’s no limit to how many coupons you can earn. Make sure to use a valid email address when completing your purchase.

 2. SAVE

After placing your order, the coupon code (or codes) will be emailed to you. Save those emails, write down or save the codes, or even take a picture of the codes so you don’t miss out on any savings!

3. REDEEM

You can redeem your coupons between 1–31 August! Use as many coupon codes as you want during checkout (tip: remember to separate each code by a space). And make sure to use them all before the month is over.

Winterly Tree Top - Creative NOW24'!

When you wanna prepare something extra special 
for your TEAM during a Stampin' Up! event. 
You go all out!
One of my favorite things to do 
is creating things for others. 


This new upcoming suite 

"Winterly Tree Top"
suite is absolutely stunning. 
Loving all the birds. Gives such a nature vibe.  


With a little embossing powder you can make a plain 
notepad extra special and elegant.


Picture below are the projects we created together during
the virtual event. Everyone that demonstrated did such an 
amazing job, showing off this adorable suite. 

This picture doesn't do these beautiful cards 
justice, my extra favorite was
the gift card box shown at top right. 
Using enamel effects just by spreading some
over the top giving it an extra copper shine is 

EXCELLENCE 5.0! 😌


Being part of SU! is so much more than creating
beautiful things like shown above. It's making new friends,
and discovering your creative self. And most importantly 
 bringing "smiles for miles"
with a simple card in the mail, handmade gift, 
and best of all welcoming anyone to join 
you; to share an amazing experience 
that could change their 
world forever. 
What are you waiting for? 
Join us and let's create together. 💛


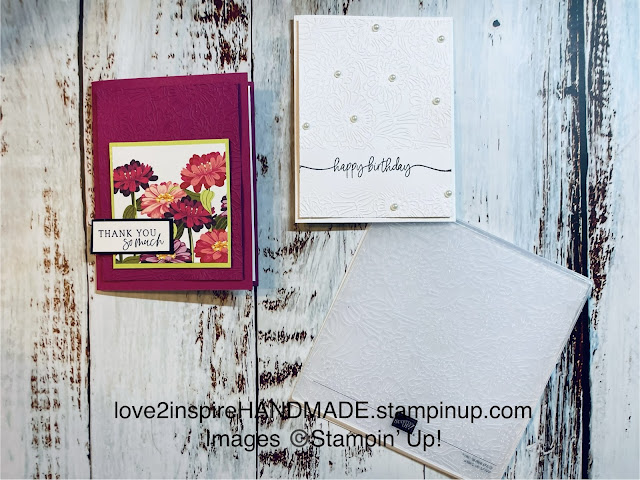
3D Zinnia Embossing Folder

Purpose is to show how using an embossing folder is sometimes all you need to create a fabulous card. 

This amazing 3D Zinnia Embossing Folder is so beautifully detailed.

 It brings any boring card stock to life. 😜


Combine it with Flowering Zinnia DSP to give it an extra touch. 


Cutest Cow Mini Treat Box

If you are like me, Im always on the search for treat bags, boxes. So when 
stumbling across this one a while back, I had to jot down the measurements to recreate. 
Unfortunately don't remember who to give credit too, on this fun creation. 
But thanks! for sharing. 
 I knew using this adorable treat box in the Mystery Tuesday Project 
with my team would be the perfect project for them. On top of the Cutest Cow
stamp & punch. Because, I can't get enough of this little cow. 🐮

Our Multipurpose glue  fits perfect inside this box, 
including other fun things like chocolate goodies. 
Here's the measurements if you are looking to try your hand at a 
simple yet adorable treat box. 


Keeping Tabs

Purpose to create swaps with Team for upcoming meeting. 
Kinda loving the new Keeping Tabs punch bundle so thought I would continue my creations with it.


It's perfect to up scale your filing system as well. 📂🙂


Supplies Used:
Keeping Tabs Punch Bundle
Something Fancy stamp set (for inside of card)
Azure Afternoon Cardstock
Azure Afternoon Ink
Petal Pink Cardstock 
Old Olive Cardstock
Petal Park Builder Punch
Adhesive Backed Solid Gems


Country Woods "Keeping Tabs" Treat Bag

I stumbled across this idea from "Stamp With Nellie" and thought it was a clever, yet adorable little bag to create. This is the perfect size for Extra Spearmint gum, Gift Card, and etc. Perfect for thinking of you or just because. 
Hope you find this little bag inspiring for you too, to recreate and share. 
Step 1: DSP of your choice. I used the Country Woods DSP.
Cut at 6" X 8-1/2"
* Score on the 8-1/2" side  at 3-1/4", 4", 7-1/4" and 8"
* Score on the 6" side at 3/4, and 5-1/4"

Step 2: Trim one end of the bag to create fold tabs for assemble. 
Using Tear Tape to the 1/2" side to the score line. 

Step 3: Fold your box together to create this rectangle look. 

Step 4: Add more Tear Tape to the bottom end where the flaps come together. 
Fold and seal bottom

Step 5: Pinch and fold down the top from the score line down.
Should look like picture shown above. 

Step 6: Using the Country Woods DSP or coordinating DSP. Using the Tab punch; punch out one tab and adhere to one side of the flap. Using whole punch. Punch whole in center of tab to allow ribbon to weave through. Wrapping all away around bag to tie a bow. 


 Supplies used to create this adorable little treat bag.

- Country Woods DSP # 163393

- Keeping Tabs Punch bundle # 163540

- Gold & Silver 1/8" Combo Trim Ribbon # 161633

- Early Espresso Ink # 147114

- Tear Tape # 154031

Shop with me:

Frog & Friends Kit-Together via ZOOM!


This month in our Kit Together we are using 
the adorable Frog & Friends Kit
Tune in with me  Tuesday, June 18th via ZOOM.

I will be in Colorado on this one. 
So don’t leave me hanging creating all alone. 

Flowering Zinnias "Loaded Pocket Envelope"

Flowering Zinnias turned out to be one fun pack of Designer Series Paper that through the past couple of months I truly enjoyed creating with. I stumbled across this adorable idea from "Really Robin Stamps" and new I had to give it a whirl myself. 
Loaded Pocket Envelope
* 12" X 12" Designer Series Paper
* Score at 3-1/4" in from each left and right side.
* Rotate Score at 3-3/4" up from bottom side.

Supplies: 12"X12" DSP,  Tear Tape, and Scoring Tool

Directions:
N°1. Decide the pattern on the DSP so that it is vertical (if it has a specific direction). Score 3-1/4" in from each left and right side. Rotate the DSP and score 3-3/4" up from te bottom side.
N°2ͦ. Fold and press on the score lines to that they are folding towards the pattern that you want on the inside of the pocket envelope then open back up.
N°3. Fold on the two 3-1/4" score lines to the inside of the pocket. The edges will overlap in the center. Fold back the top corners diagonally to meet the score lines and create a V shape where the edges overlap. This creates the pocket opening. 
N°4. Add adhesive (Tear Tape) on one edge starting at the bottom of the V all the way to the bottom edge of the DSP and attach together. 
N°5. Fold on the 3-3/4" score line up to create another pocket and use adhesive on each of the sides to secure. 


Sticky Note Holder
* 3-1/8" X 7" Cardstock
* Score at 2-1/2", 2-3/4", 5-3/4", and 6"

 This is so simple to make and you can fill the pockets of this 
envelope with all kinds of stuff to give as a gift. 

Coffee & Cards