Simple Gift Card Holder

Gift Cards have become such a big gift giving 
thing these days.The next time you plan to give 
one try this Gift Card Holder to create a 
fun festive way. You can change it up to
 whatever event you need, 
with a few easy steps. 


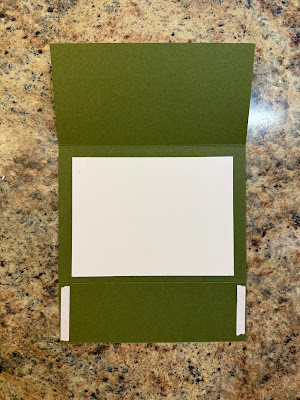
Begin cutting your card stock at 8-1/2" X 5-1/2" 
and score @ 2-3/4" and 6-3/4" 
Basic White Card stock 4-3/4" X 3-1/2"(inside)
Scrap: 3" X 3"(sentiment)
DSP: 5" X 1" and another piece 5" X 2-1/4"
Circle Dies 2-1/2" and 2"


Tear Tape on the inside of short flaps on outerside. 


Watch the video for better detailed instructions. 


Other Supplies:
Iconic Celebrations 164193
Paper Trimmer
Tear Tape
Cherry Cobbler Card stock
Peaceful Season stamp 164145 (sentiment)


 

Happy Thanksgiving from my family to yours.

Happy Thanksgiving friends!
I'm so blessed for this day. After my husband having his accident six weeks ago tomorrow,
I am able to reflect on how blessed we are to have him here with us on this day.

They have a saying you only live once make sure to live it to it's fullest. Which I completely agree with. In the past six weeks we have had many changes but most of all it has allowed us to slow down and appreciate the little things that are right in front of us. My son being absolutely amazing already, he really stepped up and helped me hold on to faith and taking care of things. My family is my rock and once again I was faced with what it was almost like not to have the love of my life with me. 


Bonus part of my day was having our beautiful daughter ring us before the day started to chat and enjoy each others company. I miss her tremendously but am also filled with 
so much joy of all she has become. 
Look forward to her coming back to the states to visit one day soon. 


My cup runneth over!


Tuesday Tips & Tricks: How To Unclog a Fine Tip glue Pen

Stampin Up’s fine tip glue pen is a great product for many different reasons. This glue dries clear and doesn’t leave a sticky residue, making it perfect to put on top of projects. It’s awesome for attaching detailed pieces to your projects or for adding shiny accents as an embellishment.


1.) Unclogging the fine tip glue pen is easier than you think. All you have to do is reach for your heat tool. Point your heat tool directly at the glue pen’s metal tip for approximately 20 seconds. Once heated, apply cap to the glue pen with the wire inside of the tip. Use a little effort to push the metal piece into the tip of the glue pen.
2.) If it won’t budge, use the heat tool for a little longer to soften the clog.
3.) Once you push the clog through, unscrew the black cap from the bottle, and use a paper clip or other small object to remove the clogged piece. Now you have a clean and functional glue pen again!

Sketch Challenge:


I totally missed getting to post and share with everyone yesterday for the sketch of the day challenge. My husband had to go to our local Hospitality ER and we ended up being there a good part of our day.


Here’s my take on this wonderful simple sketch.


I used Poppy Red card stock, along with scraps of Reindeer Days DSP, 
scraps for sentiment. and a Peaceful sentiment, with some red and white 
twine for an added bonus with a bow. 


Bag for Bath & Body Works Foam Soap using DSP


The bag uses 2 pieces of DSP cut at 
7-1/2" X 12" and score the top side at
1-1/2" and score the other (3) sides at 2-1/2". 
It's a very quick and easy bag and is a great 
way to use some of that
 DSP you may have stacked around. 

1. one side of the DSP cut like picture shown above.

2. On second DSP cut out the two outer corners, like seen above.
Watch the quick video to see how to assemble. 
Make sure to subscribe and ring the bell if you enjoyed the tutorial.


Supplies:
1 Bath & Body Works Foam Soap
2. Paper Trimmer
3. Multi purpose glue or strong adhesive 
4. (2) pieces of matching Designer Series Paper
5. Correlating Ribbon
6. Sentiment of your choices


Tuesday Tips & Tricks: Bow Tying

Bow Tying 🎀
Today let’s talk about how to tie a bow for cards, scrapbook pages, crafts, gifts and more. I hear from many of you who struggle with tying bows, and I’m here with a couple of tips and tricks to help you tie a perfect bow every time.

I’ve read that the type of ribbon you’re working with can make or break your bow. This is true. I recommend a soft ribbon with just a little bit of stiffness, because stiffness allows you to manipulate the bow when you’re done. Slick ribbon causes problems, as does very thick or stiff ribbons. You probably want to avoid these types of ribbon until you are fairly comfortable tying bows.

Traditional Method:
How to tie a bow for cards or other crafts is a traditional method. Begin with a loop held between the thumb and index finger of your right hand. Bring the tail up and over the loop, then insert through the loop in the center. Pull upward and to the right to create the second loop. With this method, you always want to be pulling the second loop upwards to create a nice-looking bow.

Two Loops Method:
My go-to method for teaching new crafters to tie a bow. Begin with two fairly large loops. ((I call this the bunny ear method)) Hold one in your right hand and one in your left. Then tie the two loops together, creating a knot. It will look very messy, but once you straighten it, it should look very nice!

When all else fails tie a knot! 🪢
Let’s say you’re not having luck with tying a bow, or you just aren’t in the mood to do so. A knot is a very nice alternative! When tying a knot, you need to wrap the tails left over right the first time, and right over left the second (or vice versa, just make sure the second time is opposite what you did first). Pull the ends straight as you’re tightening, and you’ll have a perfect square knot!


Christmas Stamp A Stack


When the Christmas season comes near 
Stamp A Stack is always
a great option to attend. We created ...
12 cards
6 designs
2 each
giving a sweet smile to someone in your life is 
the best gift of them all. 


Treat Box using one sheet 8-1/2" X 11" Cardstock.

This video tutorials provide instruction on creating an elegant treat box using only one 8-1/2”x11” sheet of cardstock. ♥️

This task guarantees a swift, uncomplicated, and entertaining experience.


Watch my YouTube to see how to assemble.


Coffee & Cards - Seasons of Elegance

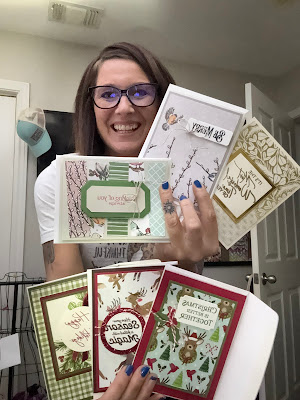
Today's Coffee & Cards workshop, featuring the Peaceful Season, was a success. Always thrilled to see both new and returning attendees showcase their artistic abilities.
The enthusiasm and happiness expressed by everyone served as a reminder of the importance of creative expression in our lives

This designer series it all in it's name. Seasons of Elegance.


Look at those faces. They loved the cards in class today. 
My favorite part of what I do.


Tuesday Tips & Tricks: Watercolor with Acrylic Blocks


Create a collage of colors using your Stampin’ Write markers.


1. Pick your clear block size, and color choice of markers.
2. You will need a water spritzer near.


3. Color randomly all over block.


4. Spritz two or three times on too block and
watch the colors spread.


5. Stamp onto card stock (set to side to dry-you may use the heat gun to speed up process.


6. Finish creating your creation.

Sketch of the Day

Using sketchs to create, makes creating cards simple.
Give it a try?!


I had fun creating this sketch with the bright colors. 🩷


Simple bag made from DSP!


Cutting & Scoring:
Here are the cutting and scoring directions when using ((2)) pieces of. 6" X 6" 
Designer Series Paper.
On both pieces, score on (3) sides at 1-1/2" and on (1) side at 1"

After scoring, on (1) of the pieces, cut on the score line leaving a flap fold
 on outer side of 1-1/2" on both sides. 

On the other piece, cut the 2 bottom corners out.

Watch the video below on how to assemble!


Want to make a larger size?

The larger one in the picture above is made (2) 12" X 12" 
pieces of DSP.
They are scored on (3) sides at 3" and on (1) side at 2". 
This one assembles the exact same 
as the smaller one. 


Sketch Challenge

Sketch Challenge:
For this one I pulled in Shimmer paper from our beautiful In Colors. I chose one tear vrs a few.
The possibilities for this one are endless. Don’t you think?

Give it a try and create your own, fun card!


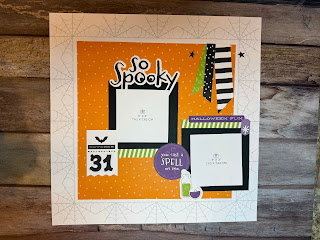
Halloween Memories

With a classic Halloween color palette and images, 
you'll have so much fun swapping out the 
included photo placeholders 
for your own photographed memories.


Watch my YouTube video to see more details of this adorable kit. 


Coffee & Cards